Learn How To Do Magic Tricks
Coin Magic – Core Training
Learn How to Do Magic Tricks: The Vanishing Coin Trick # 1
 Do you want to learn how to do magic tricks? Learning how to do magic is easiest when you have a great place to start. So, we’ll begin with the most basic of all tricks. It’s also one of the most magical: making an object disappear!
In this article, we’ll show you how to make a coin vanish completely.
(If you are interested in easy card tricks, check out this other article here.)
And we’ve included several video tutorials to make the magic easy to understand and master!
Why start with a Coin Trick?
Great question! There are a few reasons. First, coins are one of the easiest objects to start with. They’re also normal. In fact, almost everyone you meet will have one in their pocket, and that alone makes the magic much more amazing.
But the best reason is this: Not only does the vanish of an ordinary coin have the power to amaze anyone, it also has the most important secrets of magic embedded inside. We’re not going to just ‘reveal’ the secret behind the trick. Far from it. In the videos and instructions you’re about to enjoy, we’ll show you how to use the secret art of misdirection to create more than a trick…an illusion that seems just like real magic.
Before we start, here’s a final note. You can start astonishing with this miracle very quickly, but it’s important not to get frustrated if it feels as though you’re not ‘getting it’ the first time through.
We’ve broken the entire thing up into ‘baby-steps’ to make it nice and easy. Just follow along, and you’ll master a very cool coin trick…and at the same time, foundation you’ll need to pull off magic’s greatest illusions!
Materials:
 Start with a silver dollar. You’ll be able to do this trick with any coins, but you’ll actually have an easier time if you start off with a bigger coin!
We recommend an Eisenhower Dollars, because it’s nice and big and unlike older silver dollars, Eisenhower Dollars are very inexpensive.
Try and get a newer coin, that hasn’t been worn down around the edges. As you’ll see shortly, coins with freshly milled edges are easier to ‘palm’.
Pro-Tip: Whenever we start learning coin tricks, we can expect to drop our coins many times for the first few weeks. We suggest that you wait for this phase to pass before you start spending money on coins with a high silver content. Real silver coins look GREAT, but they’re very expensive.
And remember, you can practice and perform this trick with any coins you have lying around. Bigger coins are just easier to learn with…plus, bigger objects make for more impressive magic!

Have a wand/talisman/stone of your choice.
How to Find Your Personal Finger Palm Position
Phase 1
1. Watch this Video to see how your personal palm position will look and feel. Then follow the steps below to create a palm position just for your hands….so natural, no one will ever suspect you of trickery!
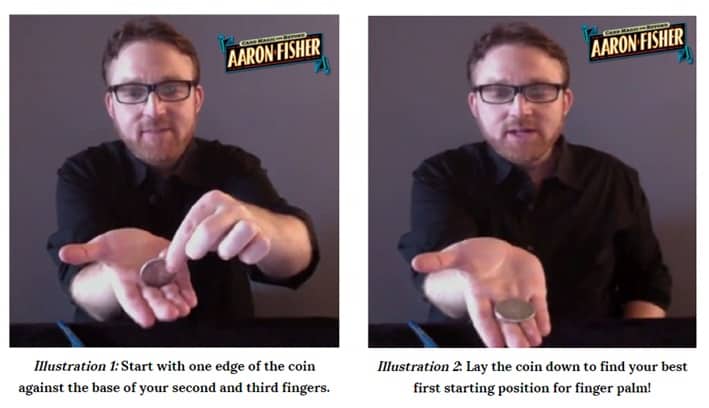
2. Start with your coin at the base of your RIGHT fingers. The coin should rest pretty evenly on your middle and ring fingers. Make sure you’re comfortable with how the coin feels.
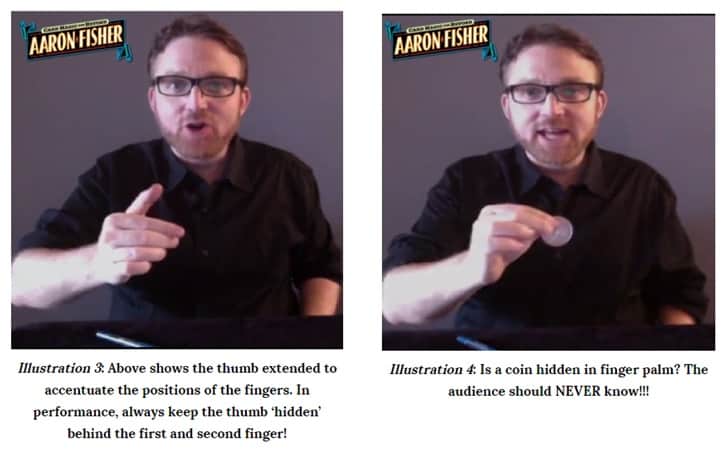
3. Form your three middle fingers into ‘Xylophone Position’. Your palming finger – your third finger – sits in the middle of a three-finger combination that looks like a xylophone. Extend your pointer finger fully and curl back your last three fingers to grip the coin.Your fingers should be staggered so the finger on top sticks out slightly more than the one below it. When you are starting to learn how to do magic tricks, this is an important hand position to remember.
Illustrations 3 and 4 below show exactly what this looks like to the audience.
4. Curl back your pinky finger. Imagine a string pulling your pinky toward your wrist. Don’t curl it too far, though, or the coin will show. If you have smaller hands, start your palm position with the third finger palming a bit of the coin (move the coin closer to your pinky).
Note: For detailed video training on finding your own personal palm position, check out our free training here.
5. Loosen up! Try to relax each muscle in your hand so the palm position doesn’t feel forced or tense. After you find a position a position at looks natural and feels comfortable, begin softening your grip, releasing tension, until you hand seems empty…even to you!
Phase 2
When you practice you palm position, you’ll get the strongest results from practicing without any coin at all! That may sound strange, but practicing without a coin will make the palm position feel natural to your hand. The more natural it feels, the more normal it will look to your audience when you are in fact palming a coin.
To make sure the position is natural, grasp the coin between your thumb and pointer finger. Your middle finger will look like it’s holding the coin when it really isn’t, and that will help you conceal any objects in your hand (see illustration 4 above).
How to Find Action Position
First watch the clear video training above. Then use the following instructions to keep track of the details that make the magic!
1. Start your routine with your best right-hand finger palm position.
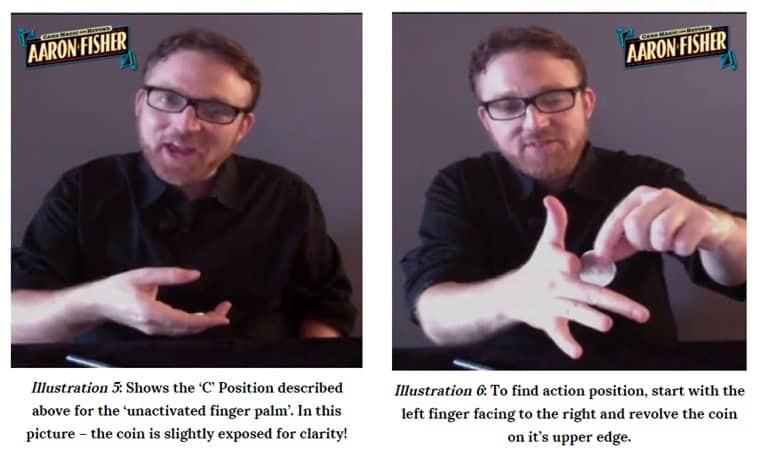
2. Cup your hand naturally in a horizontal “C.” You’ll probably find this position a little uncomfortable at first. In fact, many people have a hard time keeping the right hand horizontal.
But remember that this is a relaxed finger palm, not an “activated” one. Don’t contract your muscles in this position. Look in a mirror or camera to make sure your hand forms a “C” shape.
2. Use your right hand to rotate the coin forward so that its bottom edge rests along the top edge of your pointer finger.
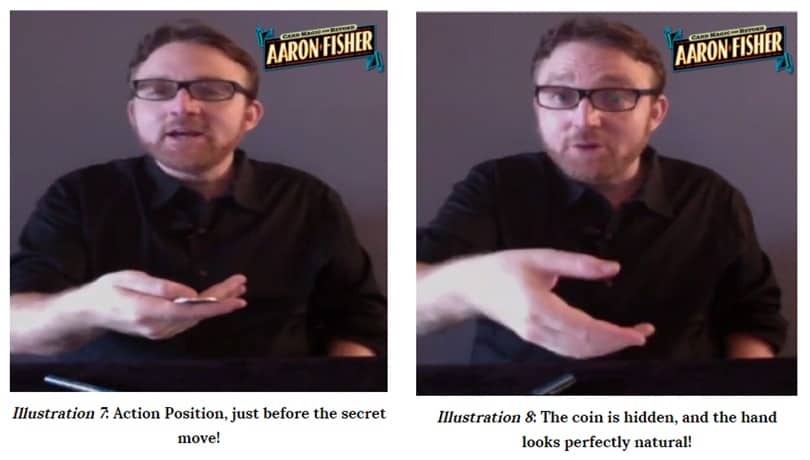
3. Going into the flip-over action, angle your right hand slightly back towards you. The coin should rest like an easel with your thumb holding it down. Your audience should see only the edge of the coin.
4. Keep your thumb subtly in position once the coin flips back. If you do this correctly, the coin should fall right into palm position.
How to Find Display Position
Again, watch the video training above, and then follow along, coin in hand, to get the details that follow!
Remember, we started by finding your personal palm position, then we ‘backtracked’ one step to find an ‘Action Position’ that ends with the coin in your unactivated, or open, finger palm. Now you’ll complete the puzzle by finding your personal Display Position. From your audiences perspective, this is where the whole illusion begins!
We call this Display Position because it will ensure your audience can clearly see the coin, and at the same time, facilitate easy movement to Action Position and finger palm after that.
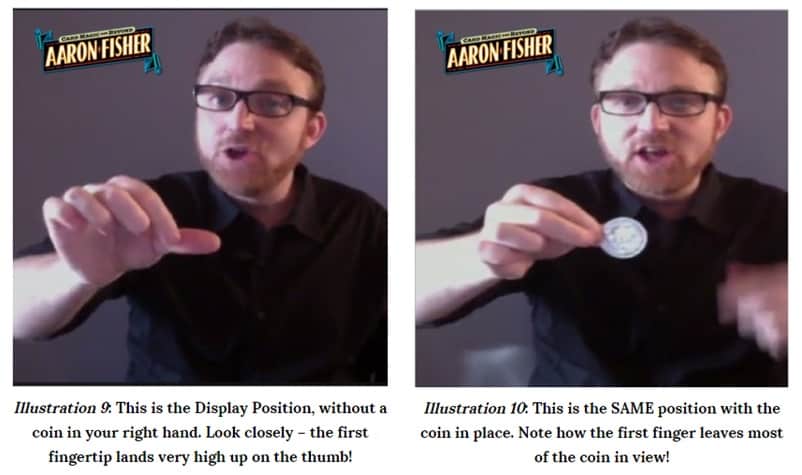
1. Before you attempt Display position with a coin in your hand, first try this exercise — Press down on the joint of your thumb with your pointer finger. Your thumb should be straight with your finger curling down.
2. Now do the same thing, this time actually holding a coin! Pinch the coin at the very edge with the tip of your pointer finger near the joint of your thumb. Most of the coin will show, helping your audience retain the visual.
3. Tilt your right arm forward and back so that the coin is reflected in the light.
Alternate Method: Place your thumb in a 10 o’clock position and keep your pointer finger straight. You’ll have the same control but a much more natural look. (As you learn how to do magic tricks with confidence, you’ll often discover alternate versions of many tools and positions.)

After you get a bit of practice in the three areas we’ve just covered: finding your personal finger palm position, Action Position and Display Position, you’ll have the entire right hand sequence for one of the most astonishing vanishes ever devised.
Secret Training Strategy: Give the steps above a few weeks of practice to become comfortable and fluid. Once you’ve done that, you’ll be ready to add the left hand action to the mix and create the finished illusion of making a coin disappear completely!
Creating the Magic: Your Left Hand Action
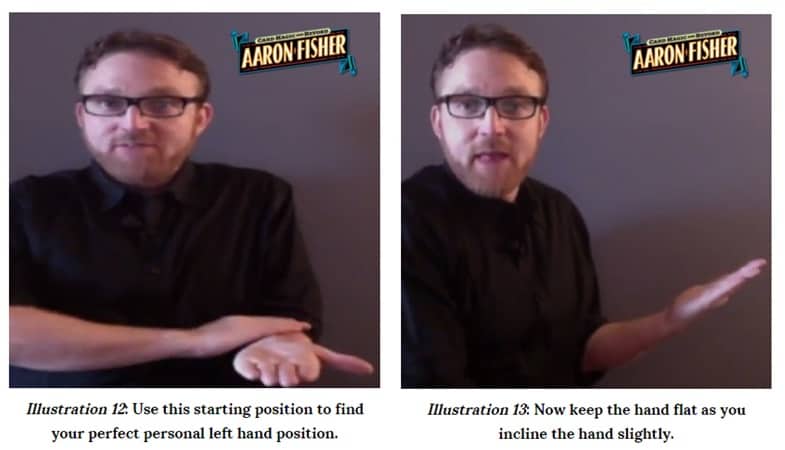
1. Start with your empty left hand.
2. Pin your elbow to your side and extend your forearm at a 90-degree angle.
3. Your entire arm and hand should be completely flat, palm up.
4. Use your right hand to move your left hand up 5 degrees on an angle. Your hand should still be flat.
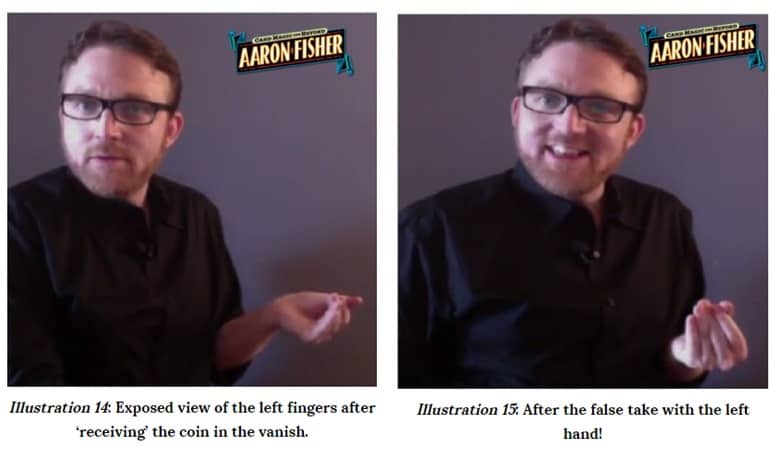
5. Using your right hand, pretend to drop a coin in your left hand. Bend your fingers at the inner joints to hide your palm and create an illusion of weight.
6. Roll your thumb behind your fingers so the backs of your fingers are facing the audience in a grasping position.
7. Reveal the empty hand.
Note: Even if it takes you a few weeks or longer, practice your palm and action positions until you have them down pat. Our next few lessons build on top of what you’ve already discovered, so to learn how to do magic tricks, starting with this incredible coin trick, you’ll want to be comfortable with the basic moves before you start to focus on showmanship.
Remember As You Practice…
- Practice the steps in the order we’ve taught them.
- Coins reflect light…and that’s crucial to the effect.
- Every time you practice palm position, double-check your fingers’ xylophone configuration.
Introduction to Misdirection
Once you have the basic finger positions described above, you’re ready to coordinate the left and right hand actions, and turn this effect into it miracle.
Here is a short list of the key things to keep in mind when you intend to perform this Coin Trick for an audience.
- Remember to have an actual connection with the audience; don’t fake it!
- Great close-up magic is more like a conversation than a performance.
- Remember the importance of your gaze in visually connecting with, and directing, the attention of the audience. After you connect with an audience member, be sure to bring your gaze back to the object of the effect. Learn how to do magic tricks.
- Your constant movement of focused attention is the first step to successful misdirection. If you don’t tell the audience which direction to go with their mind, they’ll pick their own, and that can work against you.
For more information, check out Juan Tamariz’s book on misdirection – The Five Points of Magic.
Misdirection Frame By Frame: Attention Jacking
Here’s an outline to help you keep track of the crucial information in the video above.
Open and in-transit sequences:
- Focus on your spectator (A) then shift your gaze to your object (B), such as a coin.
- Go back and forth from A to B.
- Shift your gaze from A to your wand (B2), which is the object of the open action (i.e., where you want the audience to look).
- As you look at the object of the open action, you reach for that object and do the secret move in transit.
The Coin Vanish Frame By Frame:
Frame 1: Magician says hello to a spectator (A).
Frame 2: Magician looks at the coin (B).
Frame 3: Audience looks at the magician’s face as she returns her gaze to A.
Frame 4: Magician shifts gaze to wand (B2), and audience sees the wand.
Frame 5: Audience sees the magician’s face bringing them back to B, which they don’t know has changed.
Frame 6: Coin disappears. This leaves the audience with pictures of the magician’s face, the coin, the wand, and then the coin vanishing. Their visual memories omitted anything in between.
Structure & Presentation
Technique and misdirection are just the beginning. If you truly want to learn how to do magic tricks that astonish, you’ll want to incorporate two more elements to the trick.
With a strong structure and clear presentation, you’ll have everything you need to perform miracles that can astound anyone!
- Structure can be in a single effect that grows into a more complex routine or in how separate routines are put together in a show.
- Your Presentation will give you the confidence to perform in front of an audience with a flawless routine.
- The layers of a routine are: Technique, Attention Management, Structure, and Presentation. A great presentation will naturally fill in the gaps if the first three elements are well-aligned. The more you work on these four layers, the better your magic will become.
Internal Monologue and Authentic Discovery
Your Internal Monologue is the silent conversation you have with yourself to make sure you’re holding the attention of the audience.
Note: It’s easy to confuse your internal monologue with the actual presentation. To learn how to do magic tricks like a real pro, avoid saying things you can simply show the audience instead!
Authentic Discovery is the ability to see each audience member and object in your show for the very first time…any time.
Remember to be patient with yourself! If you want to learn how to do magic tricks, it will take time. These skills could take four or five months to perfect, so don’t get frustrated. Enjoy the journey and the rest will come in short order.
Do you want to learn how to do magic tricks? Please leave a comment and tell us what you want to learn. I read each and every comment – and I look forward to reading yours!
