This is Part 2 of our Complete Card Magic Blueprint. This plan shows you the 22 essential techniques that drive all great magic tricks with cards.Everything we’re about to cover in Part 2 builds on the specific strategies I taught in Part 1. If you haven’t read Part 1, do it now, and don’t worry… I’ll wait here…;)
Complete Card Magic Blueprint
- Part 1: Magic Tricks: 22 Essential Sleights
- Part 2: Complete Card Magic Blueprint: 9 Most Popular Techniques
- Part 3: Sleight of Hand: The 7 Strongest Sleights for Card Magicians
Assuming you’re reading these words, congratulations! In reading Part 1, you’ve already acquired the foundation for complete card magic.
You may be asking, how is that possible?
Can a small, curated collection of specific techniques actually make it easier to master even the most advanced skills in card magic?
The surprising answer is…ABSOLUTELY. This Blueprint is your fast-path to easy card tricks!
The most powerful techniques are not as difficult as they seem. Sleights like the Double Lift and Turnover, or the Riffle Force, are not actually difficult.
However, most magicians take on these moves without first addressing a handful of simple techniques that ease the way for every sleight to come.
And YOU are to be congratulated, because most of these small, yet crucial details (I call them ‘micro-skills’) can be mastered simply by using the easy techniques you were introduced to in the first part of this Complete Card Magic Blueprint.
Complete Card Magic Blueprint: Stage 2
Thanks to the core micro-skills you’ll acquire just by using the material we covered in the Stage 1 one of the Complete Card Magic Blueprint, only one small sleight stands between you and the most powerful techniques in the world of card magic.
Without it, you can go no further. But with this one simple idea, there isn’t a single valuable technique you can’t master.
The Biggest Little Secrets In Card Magic
Charlie Miller, one of the greatest card magicians of all time, used to say The Fourth Finger Flesh Break was the most difficult move in card magic.
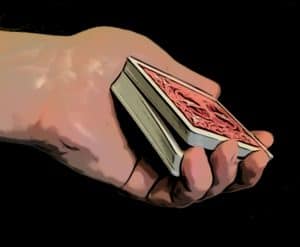
The Left Fourth Finger Flesh Break (The Pinky Break)
It doesn’t matter if you have an invisible pass, palm or half pass. If the spectator can see a line in the front of the deck, or a break between the packets, they’ll know you’re ‘up to something’. Once that happens, it’s impossible to deliver the experience of magic with cards.
Here’s video training that will show you how to catch and hold an invisible fourth finger flesh break:
Save Years of Frustration: Learn From My Own Embarrassing Story
I feel compelled to share an embarrassing story with you. I hope my mistake can save YOU some precious time.
My first book, The Paper Engine, is filled with information on how to do invisible, imperceptible passes and reverses, like my well known Gravity Half Pass.
But just a few years before I wrote that book, I was practicing over 10 hours a day, just to learn advanced sleights like the Passes we’ll cover later in this plan. But no matter how hard I tried, I couldn’t find a way to ‘break through’.
I made a lot of progress, but something was still missing. For YEARS I tried to discover the secret…without success.
And then it finally hit me…
My break was showing.
In that moment, I realized that my pass was flashing…because the audience could see my ‘secret break’ between the packets, they could effectively see what was coming…sometimes as much as 30 seconds before I ever did the move!
At that moment I decided to make my Fourth-Finger Break invisible. That became my top priority. And as I found out, just giving this one detail my undivided attention for a few weeks was enough. Before I knew it, the problem was solved…and everything began to change.
In fact, within a few months, I developed the core technique of the invisible Gravity Half Pass.
And that never would have happened if I hadn’t realized the importance of holding a break that can’t be seen.
The Right Thumb Break
The Right Thumb Break is the counterpart to the Left Fourth Finger Break. You’ll use it to transfer the break, along with the deck, from your left hand to your right hand, or vice versa, anytime you want.
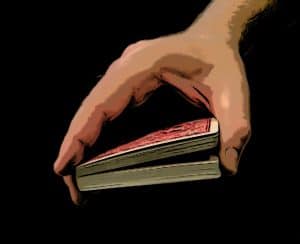
Once you have both breaks working together, you’ll be able to maintain the break no matter what happens during your performance.
Shake hands with a new spectator, pick up your drink and take a sip or get something from your pocket – it won’t matter what you need to do. You’ll have your break safe and secure. You’ll be ready to proceed anytime with complete confidence.
By the way, this is an incredible feeling of confidence and comfort. In fact, I know for sure you’re going to LOVE it.
The Two Breaks also arm you with anything you need to tackle, with ease, every sleight in the world of intermediate and advanced card magic. Now you’re ready to begin arming yourself with the most popular sleights in magic.
Here’s a video to show you the best ways to maintain a break as you transfer the deck from hand to hand:
And that’s what separates every sleight to come from all those we covered in Stage 1 of the Blueprint. Moving forward, every sleight in this plan makes use of a secret break.
And that one piece of information changes your card magic entirely. Because once you add a secret break, a sleight is no longer a sleight at all…
Complete Card Magic Blueprint – Introducing the Open Action Sleight Cluster
A ‘Sleight Cluster’ is any technique that combines two or more secret actions. In almost all cases, these secret actions are separated by Open Actions.
Open Action are actions you want the audience to see. Open actions break us secret actions, and lend those secret actions protection and cover.
For example, Double Turnovers take place as you turn a card face-up, and then face-down again. The Invisible Turnover Pass happens as you turn over the deck.
The most popular sleights tend to be Open Action Sleight Clusters.These sleights are deceptively appealing, thanks to the Open Actions that cover them, but in truth, they’re more challenging to master than they first appear.
First, they each require two or more secret actions – they’re not sleights, but sleight sequences. Second, magicians make the mistake of attempting to perform these techniques without using separate misdirection for each secret action. In most cases, we actually encourage the audiences to watch the secret actions as well as the open ones.
To perform sleights like the Double Turnover repeatedly in your performance, each of the secret actions in the sequence must be misdirected as though it were a separate sleight. On top of that, the audience must feel as though they never looked away!
When I teach the Double Turnover in our card magic coaching program, there are no fewer than 3-4 secret actions in the sequence. It’s easy to misdirect the audience during these secret moments, but if you perform the whole sequence as though no misdirection is required, you’re virtually guaranteed to raise suspicion.
Here’s a great short tutorial to show you how misdirection works with the Double Lift:
The following techniques use only a secret break, combined with Simple Stage 1 Micro-Skill, to create the most reliable, effective secret card forces in magic.
3 Elite Card Forces
The ability to ‘force’ a person to take a specific card, while maintaining their conviction that they themselves made a totally free choice, enables more direct, astonishing effects than any other kind of sleight.
Ultimately you want several deceptive, practical ways to force a card.
Once you’ve mastered the easy-to-do Crossing the Cut Force from Part 1 of this plan, you’re ready to taste the power and magic that ‘Stage 2’ Card Forces allow.
Fortunately, the most practical forcing methods come directly from the Stage 1 ‘Selection and Replacement Procedures’! If you can already to the Left Thumb Riffle, Hand to Hand Spread or Dribble, you’ll be able to transform any one of them into a powerful, practical, card force.
The Riffle Force uses the Left Thumb Riffle to secretly force the card either directly above, or below, the Fourth Finger Flesh Break.
This is one of the most practical forces, but to make sure it becomes one of your ‘go-to’ moves, develop your Left Thumb Riffle – once it looks ‘fair and square’, the force is ripe for you to harvest.
The Dribble Force is particularly useful because of the fair, almost careless look of the selection procedure. Essentially, you’ll hold a break below a force card about ¾ up from the bottom of the pack. As you dribble the cards into the left hand, you’ll ask the spectator to call ‘stop!’ at any time. Then, as the spectator’s lips begin to move, allow all the cards below the right thumb break to fall. Look away and show the face card of the upper half to the entire audience.
This procedure makes sense to the audience – and it looks natural as well.
Remember that the Dribble takes more practice than the Riffle. For that reason, the Dribble Force develops just a little more slowly than the Riffle Force. The Dribble Force is ultimately stronger, but it’s likely to take a few more months to master than a good Riffle Force.
The Classic Force lets you force a card above or below a Fourth Finger Break as you spread the cards from hand to hand for a selection.
This force looks like real magic, but it’s not 100% certain. In order to master it, you’ll need to be very comfortable spreading cards from hand to hand – slowly, quickly, one at a time or in small groups as necessary.
Ultimately, it’s all about being able to modulate the pace of your spread as the spectator goes to take a card. Every spectator behaves a little differently, and good ‘Classic Forcers’ can adapt their spread action in real time to deliver the force card just as the spectator’s hand reaches the deck.
The best way to practice this amazing, powerful force is to attempt it anytime you have a card selected…just for practice. Before long, you’ll find yourself ‘hitting the force’ more often than not.
The Classic Force is one of the most diabolical, incredibly astonishing methods you can use, so it’s worth having a ‘Plan B’ for those unavoidable times when it doesn’t ‘hit’. When your Classic Force misses, abandon it immediately, and allow your spectator to take any card they want.
Immediately proceed to perform a trick that doesn’t require a force. Then double back, and use a sure-fire method like the Riffle Force or Crossing the Cut to perform the original trick.
This is one of the oldest and best ways to handle a missed Classic Force. It’s stood the test of time because it’s always been incredibly effective.
I’ve used the Classic Force successfully in 1000’s of performances, and I’ve found that when it fails, the Crossing the Cut Force is the ideal backup. The process is swift, the result is sure…and nobody ever suspects a thing.
You’ll soon discover that merely HAVING a backup plan takes all the pressure off, and in the bargain, improves your Classic Force success rate immensely.
The Double Turnover: The Ultimate Sleight-Cluster
The Double Lift and Turnover are the most popular switches in card magic. As a practical matter, most magicians get caught doing them far more often than they would like – and arouse suspicion even more often than that.
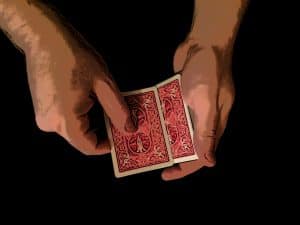
The issue arises partly because this wonderful sleight is used much too often – in many cases (like the Ambitious Card) several times in the same routine. By simply having an alternative switch in your toolbag, like the Two Handed Glide from Part 1 of the Blueprint, you’ll reduce the ‘load’ on your Double Turnover – and greatly reduce the likelihood of problems in performance.
The Experts Choice: The Robert Houdin Double Turnover Get-Ready
Once you decide you never want to get caught again during the Double Turnover, it’s time to start using the Robert Houdin Break method. Any break before a Double Turnover helps, but this is still the most reliable approach ever devised.
I can tell you from personal experience that learning this move alone was one of the best decisions I’ve ever made for my magic.
You can find this method taught twice in easy-to-find, classic books like Stars of Magic and the Dai Vernon Book of Magic, and it’s clear this method was Vernon’s preferred choice.
My own research performing and teaching this method to thousands of students has proven it further. There is no more effective or deceptive method you can choose.
This video shows you how to perform my Simplified Robert Houdin Break. It’s a great way to get started with this invaluable technique:
The Double Turnover

Most of the time, magicians learn the Double Turnover as a single action that needs no misdirection. They do the move as they look down at the cards and the audience sees the whole thing.
They get away with it once..if they’re lucky. The second try arouses suspicion, and often, by the third turnover, the audience says, “You’re holding two cards as one!”
Every magician who has attempted the Double Turnover has had this experience. I’ve had it myself more times than I can count..and trust me. It’s horrible!
Want to know more about the difference between a Double Lift and a Double Turnover? Watch this tutorial:
The Simplified Vernon Double Turnover
In my Pathways Training System, we make several alterations to the Vernon Double Turnover, which make it easier to perform so the cards NEVER split. Combined with the Houdin Break and proper misdirection, you can perform as many Double Turnovers as you want without any fear of arousing suspicion.
Whether or not you have our Pathways Training System or you’d like to get the training directly from the books mentioned above, always remember that the Double Turnover is NOT a single sleight, but an Open Action Sleight Cluster.
The Secret Reversal Sleight Cluster
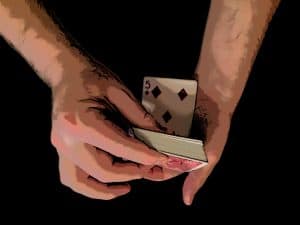
The Cover Reverse allows you secretly to reverse a card or cards at the bottom of the deck as you seem to merely turn the deck over in your hand. Like most Open Action Sleight Clusters, magicians are taught to perform this technique as though it were a single action. And again, that’s why we have problems in performance when we don’t have to.
The Invisible Turnover Pass
The Invisible Turnover Pass takes place as you turn over the deck, and it’s actually surprisingly easy to perform so that it truly IS invisible.
Most performers look at the cards as they do this pass, because the illusion is visually superb. However, when we invite the audience to ‘burn’ our hands during secret actions, we raise suspicion.
Always remember, just because a move is invisible, it doesn’t mean you should ask the audience to look at it.
Here’s a video tutorial showing you how to perform my own version of the Invisible Pass. This sleight is fun to do and easy to learn – it first appeared in my first book, The Paper Engine:
Up Next: Stage 3 – Expert Card Magic Made Easy
Congratulations! If you’re reading this, you’re in for some very good news. In Part 2 of the Complete Card Magic Blueprint, you probably discovered that many techniques you’ve been told were easy are a little more challenging than you’ve been lead to believe. At the same time, you discovered the secrets to unlocking those moves and making them your own.
In the next and final part of the plan, you’ll discover that invisible Classic Passes, Half Passes, Palms and Steals are actually easier than you’ve been told. With the information you now possess, you have everything you need to make even the most advanced sleights in magic surprisingly easy to master.
We’ll see you in Part 3!
Aaron Fisher
(Thanks for reading! Take a moment to click “share” and let other magicians know about this article. Do you have a question or comment about this article? Leave it below and we will read each and every one…)
